Sunday, July 26, 2015


Visiting Brookside Gardens in the summer during their Wings of Fancy exhibit has been on my bucket list for years.  This year, I finally made time to head up to Wheaton, Maryland with my camera - equipped with a 55mm prime and 60mm macro lens - to see what all the fuss was about. Despite being a small butterfly house, compared to others I have seen, I was not disappointed by the quantity and variety of butterflies.  Irrationally, I felt like I was often dodging the in flight butterflies, though I am positive they could easily fly around me.


There were plenty of opportunities to capture the butterflies feeding on flowers or resting on leaves.  I was happy that they had varieties with the anti-predator designs on their wings.  Can you see how the circles on the underwing above may look like owl eyes?  Or if you turn your head to the left and look at the edge of the wing, perhaps it resembles a brown snake head?


The colors and shapes of the wings were gorgeous.  I tried to capture the bright neon blue butterflies, but the only way to get them was in flight because as soon as they landed they closed their wings up to reveal the brown owl design underneath.  I felt like a crazy person, camera attached to my face, whipping around in a circle, trying to follow one of these blue guys up and around the trees and bushes.  In processing, I had only one shot that mostly worked, but not a close up.


My favorite photo is of these dueling butterflies that are positioned so perfectly atop a rock to make it appear as if it's a mirrored reflection.  During processing, I also looked for crop opportunities to capture the detailed coloring of the wings, which at that zoom level makes them look more like paintings or a woven tapestry. It really is amazing what nature has created.


And, of course, we can't leave out the little guys who will soon become a beautiful butterfly: the caterpillar.  These were in a separated area for protection.  A box of cocoons was also on display.


Brookside Gardens is part of the Montgomery County Parks system.  The Wings of Fancy exhibit is open from July through October.  There is a small admission price for adults and kids 3 and older, but I think it is worth the fee as it helps to support the maintenance of the rest of the gardens.

Posted on Sunday, July 26, 2015 by Julie

1 comment

Saturday, July 18, 2015


I'm very excited to be returning to Scotland next month to attend the Edinburgh Fringe Festival and drive around the highlands with my camera, so to celebrate I baked - of course - some Scottish Highland Cows (or "Hairy Coos") in cupcake form!  I saw these while doing a google image search for another project and was in the kitchen baking them a few days later.  The cupcakes themselves are easy, so long as you have the right tools.  First, the cupcake itself is just a boxed cake mix - I chose butter yellow because that was the mood I was in.  Any flavor will work.  The "hair" is standard buttercream:

  • 1 cup softened butter  (whip this first in an stand mixer)
  • 1 lb powdered sugar (added a bit at a time to the butter until incorporated)
  • 1 tsp vanilla
  • 1-2 Tbsp milk (after added, beat buttercream for 3 minutes or so)
  • Extra powdered sugar as needed to thicken
  • Colored with Americolor gels: 104 Chocolate Brown and 113 Orange (used a little bit at a time at a 2:1 ratio to get the reddish brown, adding more to saturate)

The nose and horns were molded from pre-made fondant from Wilton (small box), with the nose colored with a tiny toothpick tip size of Americolor 125 Terracotta.  I shaped the noses and horns and let them sit out on a tray covered in wax paper while the cupcakes baked and cooled.


Other tools you will need:
  • Wilton 233 Decorating Tip (Grass)
  • Piping bags and decorating tip coupler
  • A fondant decorating tool - or a fork or toothpick - to make the mouth and nostrils of the nose
  • Optional eyeballs - I think they look good with and without

Place the reddish brown buttercream into a piping bag already prepared with the grass tip at the end. The order of piping is such: pipe the buttercream to draw down "hair" from top to bottom until the top of the cupcake is covered in brown buttercream strings (with some hair falling over the chin area), place the nose on the lower half of the cupcake and the horns a little above the nose, pipe more hair from the crown of the head and over the horn end to cover/conceal the horns and artistically fall around the nose - stopping to add optional eyeballs if wanted.

These are going to be moist cupcakes if you use boxed cake mix, so plan on eating them within 24 hours or less.  Store in a refrigerator until serving time.

In addition to the sweet little hairy coo cupcakes, I decided to pick up some Scottish whisky for a wee little tasting with friends.  I am, admittedly, not a straight alcohol drinker (a.k.a. when not mixed in a cocktail).  I do endeavor to try new things, though.  As a fan of the Starz television show, "Outlander," by way of the books by Diana Gabaldon on which the show is based (well books 1-4 are all I have read), I've been more exposed to the idea of Scotch whisky because the actors are huge fans and often drink it together for viewing parties, on panels when it's provided, or during interviews. With that inspiration, I decided to prepare for Scotland by having my own whisky tasting party.  I went to a specialty liquor store in Washington D.C. and had a long discussion with the resident whisky expert.  While I had come in with an original list of three from different regions, he steered me to try an alternative region.  


Scotch whisky is not cheap, so I challenged my whisky guide to find me good stuff for less than $50 a bottle (even better if under $40).  First, we decided on a lighter whisky from the northern coastal east highlands - Old Pulteney 12 year single malt.  I was not a fan of this bourbon barrel aged whisky!  I am not sophisticated enough to explain why I didn't like it.  To me, it just tasted like ordinary alcohol. I've had Virginia moonshine that tasted the same, even with less aging.  The aroma was very strong, like rubbing alcohol.  Oh, and by the way, for reference we drank these all "neat."


Next up was the Glen Grant 10 year single malt from the Speyside area of Scotland.  Speyside is in northeastern Scotland, in the highlands, and is the region on the River Spey.  The whisky produced here is considered a "beginners" whisky because it is supposed to be easier to drink.  Glenlivet and Macallan are two of the most recognized Speyside labels.  My whisky guide suggested I go with the Glen Grant 10 year bourbon cask aged whisky, with its more golden color.  Once again, I was not a fan, though unlike the Old Pulteney that really hit your palate up front, the Glen Grant had a complexity that hit the complete palate.  I'm trying to remember if this is the one that left me with a vanilla finish (the website suggests almond, which is kind of close in a creamy factor way).

Finally, we saved the heaviest whisky for last.  The Laphroaig 10 year single malt whisky is from the Islay region (pronounced "eye lay").  These whiskies are known for their smoky flavor that comes from the island peat that seeps into the water and barley, from which the whisky is made.  My initial response to the Laphroaig was: "I feel like I just ate a wet cowboy boot that was too close to the fire." So a real smokey, leathery taste is what I got.  And the taste hit you more in the back of the throat and lingered.  I think I also, jokingly, described it as eating a piece of charred wood fresh off the fire.  A friend of mine suggested that this is better suited to drink in a cocktail, so I'm curious to try that out.  Regardless, our pour size during the night (not surprisingly) went from a dram of the Old Pulteney quickly down to a "wee nip" of the Laphroaig, so I have a lot of leftovers if anyone wants me to host another tasting party!

Countdown begins to Scotland!  In the meantime, I gift you with these Scottish treats:


By the way, people have asked me if there is anyone I would like to meet who I have not yet met. Sean Connery is definitely on the top of that list!


And one more...


Posted on Saturday, July 18, 2015 by Julie

10 comments

Wednesday, July 15, 2015


Do you ever remember, as a kid, going to a birthday party and having "dirt" for dessert.  It could be a jar or container with anything sweet inside - cake, brownie, ice cream - so long as it had finely-ground chocolate cookies sprinkled on top, straws full of flowers stuck in it, and gummy worms crawling out the side.  Well, fast forward to today, where making dirt for dessert got infinitely easier! Enter the flower pot silicone baking cup!  I found mine at Michaels, but google the term or click here to get yourself a set or another set like it on Amazon.


Flower Pot Cupcakes

Ingredients

  • Box of chocolate cake mix, batter prepared as directed on box
  • Chocolate mousse - store bought prepared, from a powder kit in the baking section, or from scratch
  • Oreo cookies - chocolate cookies separated and white middle removed
  • Plastic straws
  • Flowers (choose ones with thinner stems)


  1. Using boxed chocolate cake mix, prepare the batter as directed, then fill the flower pots to the indicated fill line on the mold.  Set the molds in a cupcake tray for ease of baking and transportation, then bake as directed and check for doneness using the clean toothpick method.
  2. Cut the straws so that they are just below the rim of the cupcake flowerpot mold (you should get two good cut straws per original straw).  Prepare two for each cupcake.  Using a spare straw, punch into the cupcake where you want a flower to be.  Pull that straw out and replace the hole with a cut straw.  Gently blow in the end of the spare straw (I did it into the sink)to empty out the cake that was just removed.  Repeat the process for all straws.
  3. Either buy or prepare chocolate mousse while the cupcakes are baking and cooling.  I opted to cut off the dome of the cupcake to make room for mousse and dirt (also, I saved the scraps for cake snacks later).  The mousse is nice for getting the needed adherence for the "dirt." The absolute best way to add the mouse is to use a piping bag (no tip needed) or even a ziploc bag, sealed with the corner snipped off.
  4. Place cookies in a blender or food processor, and blend the cookies into a fine powder.  Gently sprinkle the cookie dust until mouse is completely covered.
  5. Cut the flowers down so that the stem is 4-5 inches and select the thinner stems to fill the straw.
  6. Keep finished product in the refrigerator and serve soon thereafter.


Posted on Wednesday, July 15, 2015 by Julie

1 comment

Monday, July 13, 2015


Well, it's almost halfway through the summer and I'm finally posting my first recipe for my summer drink series.  Fortunately, to make up for my tardiness, it's a really good one!

My neighbor first made these for a party about a year and a half ago, and I have been hooked ever since!  I never really drank bourbon before, and this is the perfect combination of fruit juices and sweetness has eased me into the idea of bourbon consumption.  The mix should be made at least 24 hours in advance, though from experience I would recommend 48 hours to ensure that the liquid has all "slushified" in the freezer.  While it worked for a little bit as a beverage in a cooler at a potluck this past weekend, fortunately it was a big hit and all the slushie was depleted quickly because a cooler full of ice just can't keep the frozen consistency as well as a freezer.  So you may have to keep this on the "house party only" list.

Bourbon Slushies


Ingredients

  • 6 oz frozen orange juice concentrate
  • 12 oz frozen lemonade concentrate
  • 24 oz can pineapple juice
  • 2 cups strong brewed black tea
  • 500-750 ml bourbon whiskey (depending on how strong you want to serve it)
  • 1 1/2 cups granulated sugar
  • 1 liter lemon-lime soda
  • Maraschino cherries for serving


  1. Mix the juices, tea, whiskey, and sugar in a large bowl until the sugar has been incorporated.
  2. Transfer into a large sealable storage container and place in the freezer.
  3. Freeze the mixture for 24-48 hours, erring to the longer duration.
  4. Remove from freezer and break up the mixture (if too hard) with a whisk to get it to the slushie consistency.
  5. Use an ice cream scoop to place 2-3 scoops in a cup.
  6. Top with a splash or two of lemon-lime soda (add more if the slushie is too strong for your preferences).
  7. Add a maraschino cherry and some cherry juice for garnish.


Posted on Monday, July 13, 2015 by Julie

2 comments

Sunday, July 12, 2015


It seems ridiculous, but my friends with kids seem to stress out way too much about their childrens' birthday parties.  I remember some of my best parties as a kid were at Burger King or at my house with a scavenger hunt/sleepover.  But for some reason, today, parents are spending hundreds of dollars on elaborate parties - food, space rental, prizes, etc..  My point is not to judge parents for doing this, just to suggest that there is an easier, more cost efficient way to at least handle the dessert portion on your own.  My all ages solution is my Movie Popcorn Cupcakes.  Could not be easier to make!  I would also say that, especially if you have younger children, these Sesame Street Cupcakes are another easy to make dessert that gets a high impact response!

What you will need:  (most of this can be purchased online, Amazon, Michaels, etc.)

  • Boxed chocolate cake mix, prepared using the directions on the box
  • Cupcake liners
  • 1 can of store bought vanilla frosting for each 6 cupcakes you plan to make
  • Americolor food coloring gels in the following colors (depending on which characters you plan to make -- Cookie Monster is blue, Elmo is red and orange, Oscar is green, red, and black):
    • 101 Super Black
    • 102 Royal Blue
    • 103 Sky Blue
    • 111 Leaf Green
    • 113 Orange
    • 120 Super Red
  • Wilton candy eyeballs
  • Wilton Tips: #3 Round and #233 Grass
  • Plastic Piping Bags
  • Piping Bag Coupler
  • Optional:  Store bought chocolate chip cookies, cut in half to put in Cookie Monster's mouth

Prepare the cupcakes and let them cool on a wire baking rack.  As they are cooling, color the frosting in separate bowls.  For the orange and black, you will not need much because they are just used for Oscar's eyebrows and Elmo's nose.  To make these 6 cupcakes, and a 7th which was my trial Cookie Monster, I took one can of frosting and divided it into thirds in 3 bowls, then took 2-3 tablespoons evenly from the bowls for orange and another 2-3 tablespoons for black.  If you are making more than 6 cupcakes, obviously multiply these numbers as needed.  For the blue, I mixed Sky and Royal Blue to get the color I wanted.  I piped the hair on one color at a time and reused the grass tip.  If you are not sure how to use a piping bag, tip, and coupler, here is a good online video:


For the decorating, the best gift I can give you are these videos from I Am Baker:


I pretty much just watched them and then went for it on my own.  The grass piping tip takes awhile to get the feel for, and a couple of times I had to take a knife and scrape it off to start over.  You'll get it, trust me!  And that is pretty much it...bake cupcakes, cut mouth, pipe fur, add eyes, add final detail!


Posted on Sunday, July 12, 2015 by Julie

1 comment

Saturday, July 11, 2015


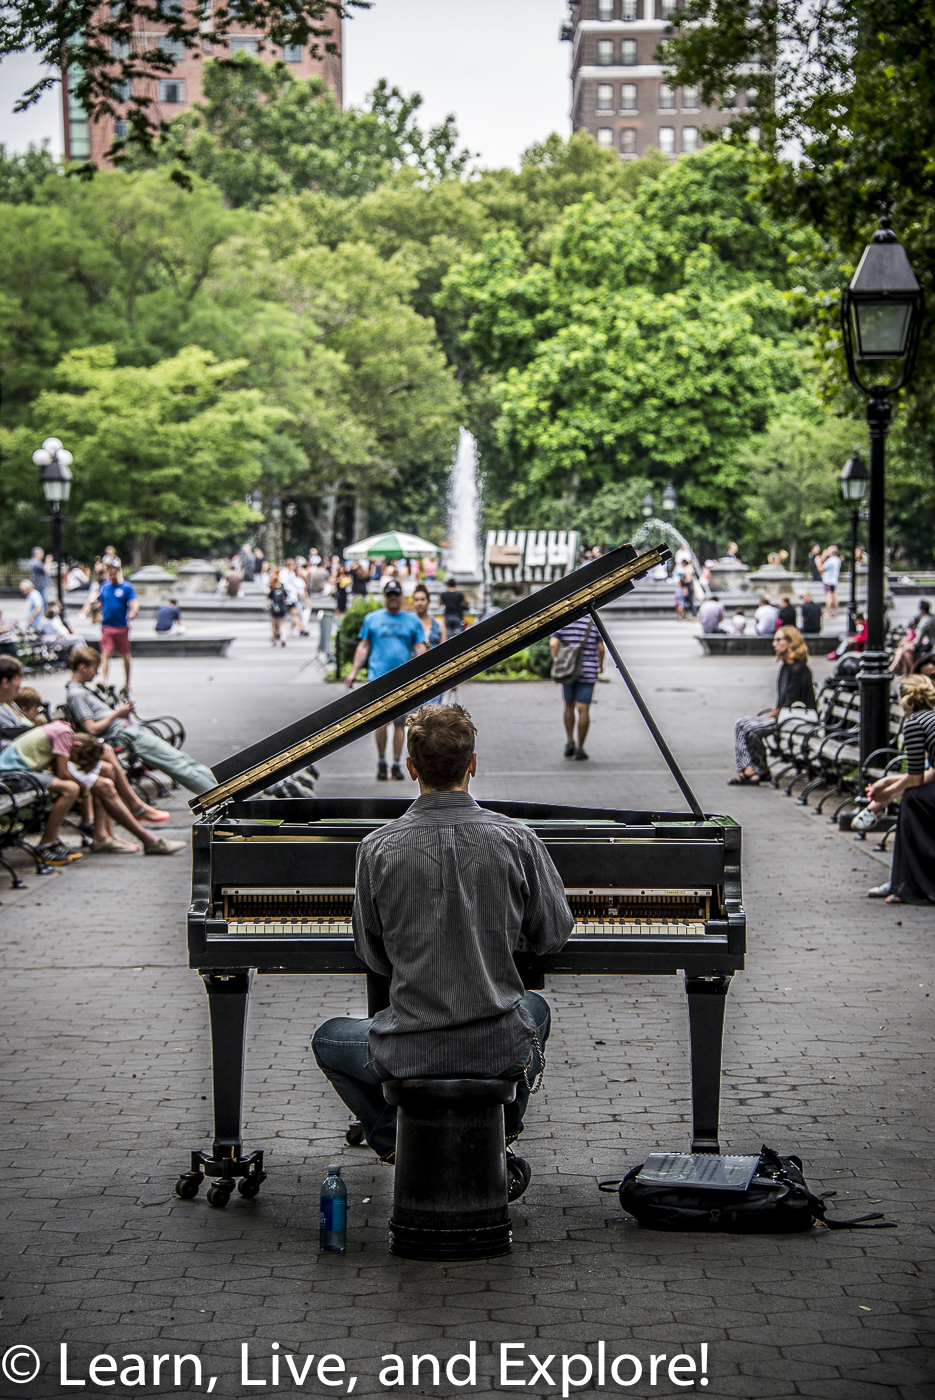
The original plan was a NYC microadventure of some old mews and alleys in Greenwich Village, or "The Village," that are reminders of the horse and carriage days.  Many of these old buildings that remain were once rows of stables that belonged to nearby residences.  There are a handful left in Manhattan, and a few more in Brooklyn, which I will have to see on another trip up to the city.  So while I had planned for finding and documenting these small streets, what I got instead was a multitude of historical surprises and other beautiful treasures that tourists who concentrate their time in midtown (don't get me started on the gross people in animal suits in Times Square!) and Central Park never get to experience.  One of these gifts was an NYU student who had wheeled out his piano to Washington Square Park to entertain park goers.  He was playing Beethoven's "Moonlight Sonata."


I spread my Village small street scavenger hunt over two days because of other time commitments during the weekend.  My first stop was Grove Court, a hidden gated courtyard off of Grove Street.  These mid-19th century townhomes originally built for tradesmen embody old New York charm.


Grove Court is located right at the bend in Grove Street.


A surprise bonus from this stop is the apartment building just steps away on the corner of Grove and Bedford.  Do you recognize the facade? It was used in the title credits for Friends, so this was apparently where Rachel, Monica, Chandler, and Joey lived.


Washington Mews, next to the NYU campus and Washington Square Park is a perfect example of a late-19th century row of stables that were typically aligned to one of the luxury townhomes that border Washington Square Park.  Now it is a gated street that is occupied by various NYU foreign language organization offices.


MacDougal Alley is similar to Washington Mews, a former 19th century row of stables, but has a more recent history in the 1900s as the location of residents that were famous artists, like Jackson Pollock, and poets.  Today, the buildings are used by NYU.


Patchin Place is a residential gated alley off of 10th Street with ten townhomes built in the mid-19th century to house local hotel workers.  The only remaining working gas lamp is at the end of this street, though now it is wired for electricity.  Patchin Place has had its share of famous residents, primarily authors - the most famous being e.e. cummings.


Going back to Grove Court and the Friends apartment building, also on the corner of Grove Street and Bedford Street is a large three-story wooden townhome that struck me as out of place in this neighborhood and as something I was more likely to find in my hometown of Alexandria, in Georgetown, or in Philadelphia even.  So, I hopped on Google and not only got my answers, but got a separate scavenger hunt idea: the oldest homes in Greenwich Village.  Starting with 17 Grove Street, this home was built 1822 by William F. Hyde.  The third story was added in 1870.  It is one of only a handful of woodframe homes in New York because of the fire risks.  Take a look at the corner of the roof and see if you can spot the little brown owl.


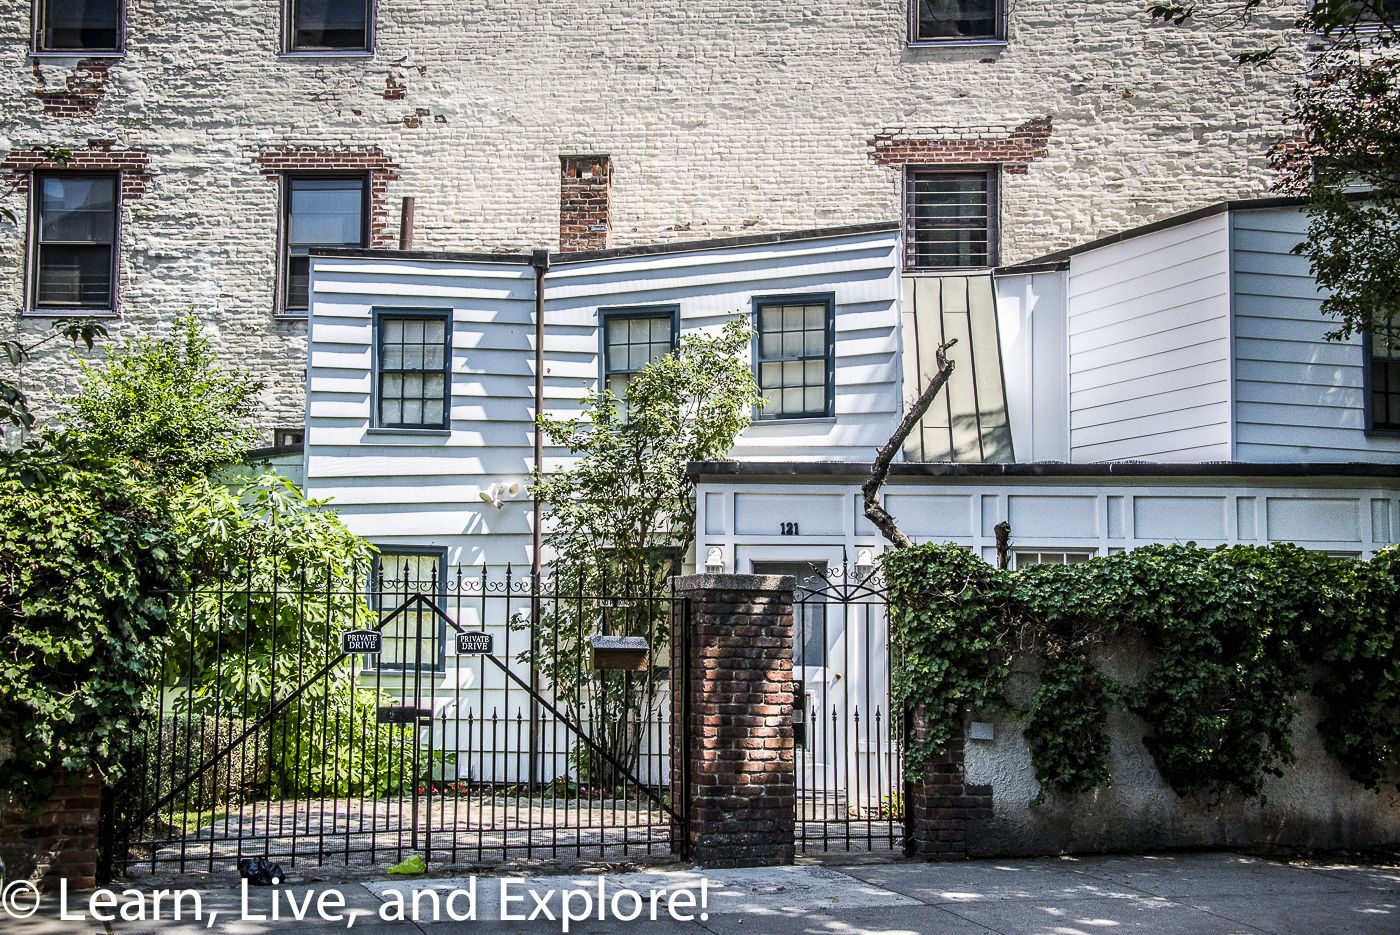
Moving on to 121 Charles Street, there is a wood farmhouse that has the oddball lines one would expect from a modern Hundertwasser or Gehry-esque architect.  This farmhouse actually was not original to this land, rather it was transported in 1967 from a site at 71st and York.  The construction date of the home is unknown.  The author of "Goodnight Moon" briefly called this her home prior to its move from uptown.


I made a stop at 77 Bedford Street to take a look at the 1799 Isaacs-Hendricks house, but it appears to be undergoing an external renovation and is covered in scaffolding.  So, onto 81 Barrow Street. While not one of the oldest homes in The Village, it is one of the few remaining pre-Civil War Italianate mansions, built by James Vandenberg (architect of Trinity Church) in 1853.  The author Isabel Bolton lived in this home for many years in the mid-20th century.


Finally, I found the oldest home in The Village located at 44 Stuyvesant St.  This Federal-style house was built in 1795 for Nicholas William Stuyvesant.  This is one of only three buildings in NYC from the 18th century that has been maintained as a residence for its entire history.


Just down the road at No. 21 Stuyvesant Street is a home from 1803, built by Petrus Stuyvesant. The facade of the home is nearly exactly how it was when it was originally built.  This home was surrounded by gardens and land until the mid-19th century when a death allowed for the building of the attached Italianate townhomes.


Stuyvesant built the house for his daughter, Elizabeth, and her husband, Nicholas Fish.  Fish was good friends with Alexander Hamilton and General Lafayette, so you have to wonder who else walked up those stairs and knocked on that door.


And that concluded my (double) NYC microadventure discovering the historical past of Greenwich Village architecture!

Posted on Saturday, July 11, 2015 by Julie

1 comment

Tuesday, July 7, 2015


I absolutely love that NYC is a relatively quick drive away because there have been fantastic performance opportunities lately! Specifically, this summer the Encores! at New York City Center gave theater fans more of the Encores! Off-Center series - a series of three revived off-broadway productions produced by Jeanine Tesori, the composer of Tony Award winning Fun Home, Violet, and Shrek.  All of these shows are performed in the Encores! style of about a week of rehearsals before the show opens for only 3-5 performances.  I got to see two of the three from this season - "A New Brain" starring Jonathan Groff and "Little Shop of Horrors" with Jake Gyllenhaal as Seymour, Ellen Greene reprising her movie role as Audrey, and Taran Killam as the crazy dentist.  While the chance to see those shows was thrilling, I can never go to NYC and not binge out.  Yep, it was time for me to fill up on some Broadway and to finally check out something that has been on my to-do list for a couple of years.

A New Brain


As I mentioned, "A New Brain" was the first performance in the Off-Center series.  I am a huge fan of Jonathan Groff, so it was guaranteed that I would love the show.  The back story of the production is fascinating as well.  As told by Groff, he had an obsession with the musical back in high school and had used the song "I'd Rather Be Sailing" as his audition song many times.  Coincidentally, he had been thinking/wishing/hoping just last summer to one day get a chance to be in a production of "A New Brain" in New York.  The Encore! series format was perfect for him because he didn't know his availability with his, then, T.V. show shooting schedule. With Encores! he could satisfy both the craving to perform on stage and the scheduling issue because of the short timeframe.  Around that same time, Jeanine Tesori emailed him out of the blue to ask him to be a part of the 2015 Encores! series, specifically (no joke) to perform "A New Brain."  To be a fly on the wall when he read that email!


Groff's portrayal of Gordon Schwinn, a composer for a kids show struggling to find inspiration who is diagnosed with a brain tumor, was both funny and touching.  Ana Gasteyer was fantastic as his mom who just wants to fix things, as mothers want to do.


Before the show, Jonathan did a one-on-one interview with Jeanine Tesori for a select group of ticket holders who came early.  This was one of Jeanine's "Lobby Sessions" that she enjoys giving to fans and theater goers during the Encore! series.  For a half an hour, Jonathan reaffirmed his reputation as an all-around nice guy who everyone endeavors to work with because he is the shocking combination of incredible talent and kindness that is a rarity in the NYC theater world.  Here he is talking about his typical pre-show warmup routine.


If you missed seeing Jonathan Groff on stage for "A New Brain," you have plenty of time to see him as he continues his run as King George in the fantastic production of "Hamilton" - opening on Broadway July 2015.  I saw the show (and Groff) at the Public Theater earlier this year and am excited to see the enhanced Broadway version soon!  It's the history of Alexander Hamilton told through hip-hop and rap songs imagined by the amazing mind of Lin-Manuel Miranda.  Here's a gorgeous shot of Jonathan Groff taken for the upcoming issue of Cosmopolitan (Photo: Martin Schoeller)


Little Shop of Horrors


OK Encores!, you had me at Jake Gyllenhaal can sing??  I can most certainly confirm that he can! And for an actor that more often plays strong, high status roles, it was refreshing to see him as the vulnerable Seymour who just wants to impress a girl and make people happy.  I also couldn't pass up an opportunity to see Taran Killam interpret the role of Orin the sadistic dentist, a role made iconic by Steve Martin in the 1986 movie version.  And, of course, there was Ellen Greene who, at age 64, doesn't seem to have aged since she played Audrey in that same movie.


(Photo Credits: Sara Krulwich/New York Times and Joan Marcus)

Fun Home


This year's Tony Award winner for Best New Musical is a look back on the narrator's childhood living with a closeted gay father in a funeral ("fun") home.  In college, the narrator discovers her own sexual preferences for women, which also happens to coincide with her father's own struggles with suppressing his urges that leads to a tragic ending.  The show is presented in the round, which is a perfect complement for the production.  All of the cast is fantastic, especially the kids.  Favorite song from the show: "Telephone Wires."


Finding Neverland


Starring Glee's Matthew Morrison as J.M Barrie, author of Peter Pan, this production follows the plot of the movie of the same name, starring Johnny Depp.  Despite the less than happy ending, which those familiar with the movie should remember, the show is an overall success.  I can't say that any particular musical number stands out.  Rather, it was the visual of the production, sets, choreography, and costumes that are imprinted on my brain.  The show follows the themes of embracing the magic of a child's imagination and how we all are still kids at heart.  I was fortunate to also see the show while Kelsey Grammar was still playing the role of Charles Frohman/Capt. Hook before taking a summer hiatus.  This is a Broadway show that is perfect for kids - it even has a real dog ("Nanny")!

Sleep No More

This interactive theater experience has been on my radar for a few years.  Produced by Punchdrunk theatre company, this "continuous" performance, loosely based on Shakespeare's "Macbeth", can be found on several floors of an old warehouse building on W. 27th Street.  Named the McKittrick Hotel for purposes of the show, you purchase your ticket based on your preferred "check-in" time and have up to 3 hours to view/follow the action. After checking in, you are ushered into a bar area where you wait to be called.  Once your number is announced, you proceed to another room where you are given a white Venetian festival mask to put on with the instruction that from that point forward, you must be silent.  The mask is meant for your safety and the actors' safety because it distinguishes between the two.

Your group enters an elevator and are dropped of randomly on one of the performance floors - or, in some cases, several floors in order to split up parties and encourage individual exploration.  I was dropped off on what seemed like a 1930s-era naturalist museum or shop with music from that period playing loudly over speakers.  You are encouraged to look at the items in every room, read letters, open books, do whatever you desire to engage with the production.  Outside of the shop, it appeared to be a street scene.  It was here that I encountered my first actor/character who was running and appeared to be hurt.  I was told that some people prefer to follow specific characters around the rooms/floors.  I opted to observe for a little bit, then move on.  I feel like the most unsettling floor was the asylum and its nurses/actors.  Prepare to encounter a little bit of artistic nudity during the show!  In my case, I felt a little creepy observing those scenes behind my mask.


Here is a great write up I found from  2011 in the New York Times that can explain better than I ever possibly could: "Shakespeare Slept Here, Albeit Fitfully."  I'm not sure if I would go back for a second time, but there are fans that have seen it many times.  There is even a century club for people who have been to the McKittrick Hotel over 100 times!


Fish in the Dark


Any fan of Larry David is going to love this show.  It is basically an episode of Seinfeld, without Jerry Seinfeld, of course.  That's pretty much all I have to say!

Posted on Tuesday, July 07, 2015 by Julie

No comments